Tuesday, September 27, 2016

Shaker Pocket and Trim for Happy Mail

Trim
Shaker Bag
Bagged Tim
SHAKERS

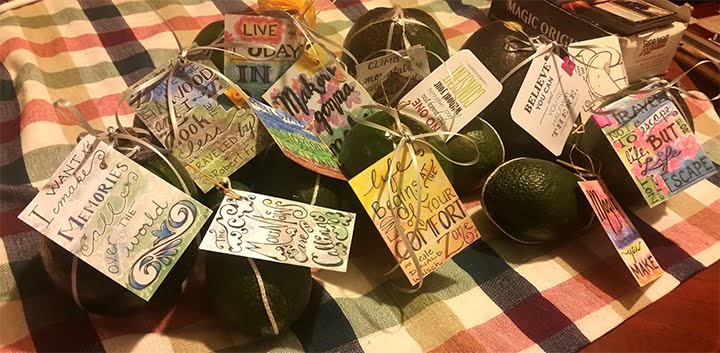
With all those little pieces of scrap paper that are trimmed off, I've been punching shapes before tossing the last bits. Because the butterfly is the smallest punch I have, I have a lot of tiny butterflies.

Into the shaker, I added in some seed beads and heart sequins along with the butterflies. The last thing to go in were the letters I posted yesterday (primed with Gesso) with the tags. I colored the tags with Sharpie and used a Micron to write the recipients name on the letter.

Fuse tool

Yesterday I mentioned that I often didn't wait long enough for the Fuse tool to heat, well, on the bottom of the upper right shaker you can see that I had to go over it several times in order to get the plastic to stick together. On the other shakers you can see the single line where the tool had heated long enough and the plastic stuck together on the first run.

Garland Trim

With some punched flowers I created these garlands for trim, they are about 10 inches long and super easy to make using double faced tape. Just roll a bit of tape out exposing the sticky side, stick on a large flower and about a quarter inch apart stick another large flower, then between the two stick a small flower. I added half pearls to all of the flowers and slipped them into these bags I made from the tops of the page protectors I had waiting for such a project.

The next project for this Happy Mail will to make some ATCs and tag thingys. Then it will be time to decorate the folders... make extra bits and do the envelopes... I need to start on Christmas Happy Mail, but am doing this first, putting it off... ruminating, that's the excuse ;)

Have a great day!

Theta

Monday, September 26, 2016

Garland Wrapped Tags

Tag on the left is covered in Gesso, the tag on the right is as it printed,  the letters have a layer of Gesso
First finished tag
Five finished tags
The last couple of days I have been working on tags and garlands to wrap around them for my Happy Mail.

For the tag base I printed off some tags from Tati Scrap (scroll way down) or here. But, since my printer was running out of ink, they printed beige at the top (about 1/10th) and purple at the bottom. Not liking to throw things away, especially things I print, I saved them.

Since I printed the tags with my inkjet printer, the ink is not waterproof. I first used a waterbrush and let the ink bleed. Then on the first tag, I used alcohol ink and pens letting the ink bleed. But, on the set of five tags, I used Staedtler Watercolor Crayons in blue and red, blending them with my waterbrush. After the background dried, more or less, I stamped an Inkadinkadoo swirly dragonfly stamp and on top a Heidi Swapp word background stamp using Tsukineko Memento Elderberry and Brilliance Galaxy Gold inks respectively. For the finishing touches on the single tag I outlined the tag with a brown sharpie and then edged the tag with a white Sakura Gelly Roll. I didn't like the brown as well as I thought I would, so I didn't use it on the other tags, but did stick with the white Gelly Roll.

For the garlands, I glued one of the glitter butterflies in the center of red crochet thread. On either side of the butterfly I glued punched flowers and hearts.

Garlands
Once everything was dry... waiting is so hard to do, I wrapped the garlands around the tags and tied a bow. I made some bags out of the tops of page protectors I had cut off for last years summer vacation scrapbook.

For the bags' sides I used the Fuse tool. The trick for me when I use the tool is to make sure it is fully heated before trying to use it to stick the plastic together. I always hurry the waiting for the iron to get hot and then the plastic sticks temporarily. I have learned to check the seal and if it didn't work, wait for the tool to get hotter and then try.

Garland wrapped tag
The last set of tags have two coats of Gesso and are glued back to back. then I used the watercolor crayons to add color. I am thinking about what to do to them next, probably stamp something on them and then add some doodling. I am planning on putting the tags in the Happy Mail with the tags with the garlands.

Have a wonderful day!

Theta


Tags with two layers of Gesso, glued back to back, and with watercolor crayon

Sunday, September 25, 2016

ATCs from the Fall Happy Mail re-gifted

Fall Happy Mail Use (Photo credit: My Daughter) :)
In the Fall Happy Mail I sent out a bunch of ATCs and my daughter decided to re-gift them.... on avocados. I thought this was a fantastic idea. Our avocado tree is in its over-production year, it does this every other to every third year, and she has avocados coming out her ears. So not only will the people she gives the avocados to get an avocado, they also get an ATC, how fun!

Have a great day!

Theta

Friday, September 23, 2016

Sparkled Butterflies (a Studio G and Stickles Diamond comparison)

 I printed these butterflies from What a Beautiful Mess and Stampomania-Challenge about a year ago and have been fussy cutting them off and on for awhile. I use them on cards and in my Happy Mail. Sometimes I glue them down as they were printed, but I like them best when they have a bit of glitter and/or shine on them. The butterflies on the left have Studio G Glitter Glue on them and the ones on the right have Ranger's Diamond Stickles. As you can see from the pictures, the Studio G brand is a greeny-blue and the Stickles is a red-gold. They each give a very different feel to the butterflies. The other difference is that the Studio G dried smoother than the Stickles. The Stickles feels like glitter and is rough, the glitter comes off a bit when brushed.

Some of the smaller butterflies I covered in Plaid's Mod Podge Dimensional Magic. This made them thicker and shiny. First I decorated the butterflies with the Studio G Glitter Glue, let it dry, then covered the butterfly with Dimensional Magic. The glitter shows up very nicely under the shine. I have not put Dimensional Magic over Stickles, but it should work the same and also help smooth the glitter out making it stay on better.

I am looking forward to having a bunch of glittered butterflies to pick from for my Happy Mail. Also, now I won't have to wait for the butterflies to dry before using them, which will make the creating process go a bit faster, possibly...

For the antenna, I have been using some pearl cotton yarn that is about the thickness of one or two strands of black embroidery floss. I think it is for crocheting and may be a #8 thickness as the DMC Petra I have is a #5 and thicker.

Have a great day!

Theta

Thursday, September 22, 2016

ATC Doodle #16

#599 Doodle
This doodle I composed from parts of doodles I did while working with my son on his math.

Have a lovely day!

Theta

Wednesday, September 21, 2016

Tuesday, September 20, 2016

2016 Fall Happy Mail #4

2016 Fall Happy Mail #4 Front
This is the last of the Fall Happy Mail I sent out. I apologize for not getting a picture of the back of this flip book, but it is similar to the other folder backs.

The first flip has two layouts with an ATC tucked under a pumpkin.

The second flip reveals two pockets filled with ATCs and goodies.

The center flap lifts to show the rest of the ATCs and a tag.

2016 Fall Happy Mail #4 First Flip
With a few stamps, a Big Shot, some dies, a bit of washi tape, a limited selection of scrapbook paper, a pair of scissors, and a printer, I am glad that I can make something to send out that makes people happy. Because of where I am living, I don't have a selection of elements to choose from; I have to bring special things I want back with me when I visit the States once or twice a year. I can get colored paper, wrapping paper, ribbon, doilies, pens, pencils, paints, occasionally washi tape, punches from China, and things like that here. But, if I want something special I either have to make it myself or haul it back here in my suitcase with all the other things I have to haul back and forth (like clothes). This means that most of the things I bring back are versatile and multi-use, like clear stamps and thin dies. If I have the extra weight, I try to bring back some scrapbooking paper (paper is astoundingly heavy).
2016 Fall Happy Mail #4 Second Flip

Whoops, I lost my train of thought. I write posts up in pieces, which is why I don't usually write much... Anyway, I think I'm trying to say that even if you don't have much, with a bit of imagination and creativity, you can still make something for someone that is beautiful and will be appreciated.

Have a wonderful day!
2016 Fall Happy Mail #4 Third Flip

Theta

Materials:

Dies: Sizzix, Spellbinders,Practical Publishing Co., and Art-C
Paper: Momenta, Canson, Strathmore, Fabriano, SBC, Colorbok, Recollections, Stamperia, and Scraps
Fussy cuts: papercraftinspirationsmagazine and butterflies
Punches: China, EK Success, and Fiskars
Ink: Tsukineko
Ribbon: China
Stamps: Graphic 45 Hampton Art, Recollevtions, Art-C
Washi: Daiso, Twin Seven, Migros
Die Cuts: Recollections Color Splash


2016 Fall Happy Mail #4 Goodie Pocket

Monday, September 19, 2016

2016 Fall Happy Mail #3

2016 Fall Happy Mail #3 Front
 This is the third Fall Flip Book I sent out.

The cardstock I used for the base was Momenta Songbird. It is single sided so I glued the pieces together in offset strips. The book is about 6 inches tall by 4.5 inches wide.

2016 Fall Happy Mail #3 First Flip 
On this folder I tried different closures all unsatisfactory. I finally settled on tying the string with the dangling heart to the string with the jewelry closure that was supposed to link through the other half of the jewelry closure that I had glued to the flap. Hopefully that made some sense. The tag I clipped to the front had the recipients name on it. Each tag is the same width, but they are all different lengths. For the title, "Happy Fall", I used the Sizzix Sizzlits Graffiti font and glued the letters to an outlined Spellbinders Nestabilities Labels Seventeen. The leaves are the Spellbinders Die D-Lites Leaves 2, the acorn is a Sizzlits Die, and the Owl is from Simply Cards and Papercraft Issue 145.  Note: the die with the magazine was supposed to be champagne glasses, but instead was this owl. I bought the magazine because I really liked the owl and was quite surprised to find greeting cards with champagne glasses in the use your free gift section.

On the first page, the jar is a removable shaker and the purple cat is a set of page flags. The small funny faces flap lifts and there is a removable pieced camera. Under the flap are quotes in a pocket and some quotes pasted down.

2016 Fall Happy Mail #3 First Flip Flap Open
The Second flip has a pocket for the ATC quotes and on the flap is a quote. The clock, camera, and glasses are sticky notes from Daiso. Under the second flip flap are a set of ATCs fanned out with a paperclip.

The third flip has pockets on both pages. The one on the left holds ATCs and the one on the right has goodies: stickers, tags, elements, and diecut feathers.

On the back I used a bunch of ephemera, punches, Sizzix diecuts, and fussy cut bits and pieces.

2016 Fall Happy Mail #3 Second Flip
Under all the removable elements is a glued down element. That way when all of the removable pieces are taken out, the book still looks complete.

Have a great day!
2016 Fall Happy Mail #3 Second Flip Flap Lifted

2016 Fall Happy Mail #3 Third Flip
 Theta


2016 Fall Happy Mail #3 Third Flip Goodies

2016 Fall Happy Mail #3 Back
Materials:

Dies: Sizzix, Spellbinders,Practical Publishing Co., and Art-C
Paper: Momenta, Canson, Strathmore, Fabriano, SBC, Colorbok, Recollections, Stamperia, and Scraps
Fussy cuts: papercraftinspirationsmagazine and butterflies
Punches: China, EK Success, and Fiskars
Ink: Tsukineko
Ribbon: China
Stamps: Graphic 45 Hampton Art, Recollevtions, Art-C
Washi: Daiso, Twin Seven, Migros
Die Cuts: Recollections Color Splash

Sunday, September 18, 2016

2016 Fall Happy Mail #2

2016 Fall Happy Mail #2 Front
This folder is very similar to the one I posted yesterday. The next two are of a similar design, but different.

To make the base, I glued two pieces of scrapbook paper together (it is single sided and rather thin) and used more of the same paper to make the hinges. Knowing that the booklet would be rather thick, because of all the quote cards, I left 1/8 of an inch on the right side fold and about a 1/4 inch on the left side between the pages before glueing the hinges down.

For the closure, I wrapped a ribbon around the  booklet and tacked it in place. Then I glued down the decorations over the ribbon. I like using a ribbon closure because it keeps the goodies and stuff from falling out and because the ribbon is flexible. When I add stuff, I can still keep the folder closed - the ribbon just gets shorter.

2016 Fall Happy Mail #2 First Flip
Have a wonderful day!

Theta

Materials:

Dies: Sizzix, Spellbinders,Practical Publishing Co., and Art-C
Paper: Momenta, Canson, Strathmore, Fabriano, SBC, Colorbok, Recollections, Stamperia, and Scraps
Fussy cuts: papercraftinspirationsmagazine and butterflies
2016 Fall Happy Mail #2 First Flip Flap Open
Punches: China, EK Success, and Fiskars
Ink: Tsukineko
Ribbon: China
Stamps: Graphic 45 Hampton Art, Recollevtions, Art-C
Washi: Daiso, Twin Seven, Migros
Die Cuts: Recollections Color Splash


2016 Fall Happy Mail #2 Second Flip

2016 Fall Happy Mail #2 Second Flip Flap Open

2016 Fall Happy Mail #2 Third Flip

2016 Fall Happy Mail #2 Third Flip

2016 Fall Happy Mail #2 Third Flip

2016 Fall Happy Mail #2 Second Flip Envelope Removed

2016 Fall Happy Mail #2 Back


Saturday, September 17, 2016

2016 Fall Happy Mail #1

Front
The Fall Happy Mail I sent has arrived, yay!

I printed and used all the quotes I made for our vacation and as experiments. These I made into cards, which I tucked into folders or pockets, or glued to the booklet. Behind some of the cards tucked into pockets I stuck little baggies of goodies: mostly stickers and embellishments.

I made the heart with wings, file folders, and camera embellishments from patterns I created, and I made the fringed heart (like these by Maggie Holmes) and doily embellishments from punches and dies.

Have a wonderful day!

Theta


Materials:

First Flip
Dies: Sizzix, Spellbinders,Practical Publishing Co., and Art-C
Paper: Momenta, Canson, Strathmore, Fabriano, SBC, Colorbok, Recollections, Stamperia, and Scraps
Fussy cuts: papercraftinspirationsmagazine and butterflies
Punches: China, EK Success, and Fiskars
Ink: Tsukineko
Ribbon: China
Stamps: Graphic 45 Hampton Art, Recollevtions, Art-C
First Flip Flap
Washi: Daiso, Twin Seven, Migros
Die Cuts: Recollections Color Splash


Second Flip

Second Flip Flap

Third Flip


Second and Third Flip

First and Third Flip

Back

Friday, September 16, 2016

2016 Happy Mail Envelope #4 (4 out of 4)

Fall Envelope #4 Front
Here is envelope #4. For this one, I doodled around the address and then kept on going making a sort of frame around the address. The doodling under the return address looks a bit like lace in the picture.

On the back of the envelope I wrote and filled in Yay Happy Mail. then added some doodling, a snail, and words: Happy mail, Yipee, Snail Mail, and Open Me.

If all goes well tomorrow I'll start posting the Happy Mail flip books.

Have a lovely day!

Theta
Fall Envelope #4 Back

Thursday, September 15, 2016

2016 Fall Happy Mail Envelope (3 out of 4)

2016 Fall Envelope #3 Front
On this envelope I started out outlining the addresses and then doodled randomly from there using patterns and words.

On the back I wrote and filled in Yay Happy Mail, added a snail and some doodles, and some words: 'Happy Mail', 'Yipee!!!', 'Open Me', and 'Snail Mail'.

Two recipients have received their mail, so I'll post them after envelope #4.

Have a beautiful day!

Theta
2016 Fall Envelope #3 Back